Canning sweet potatoes safely: pieces, not purée
The tested home-canning path keeps the sweet potatoes whole or in uniform pieces, hot-packs them with boiling liquid, and uses a pressure canner. Mash, casserole, butter, and pie filling belong after opening—or in the freezer.
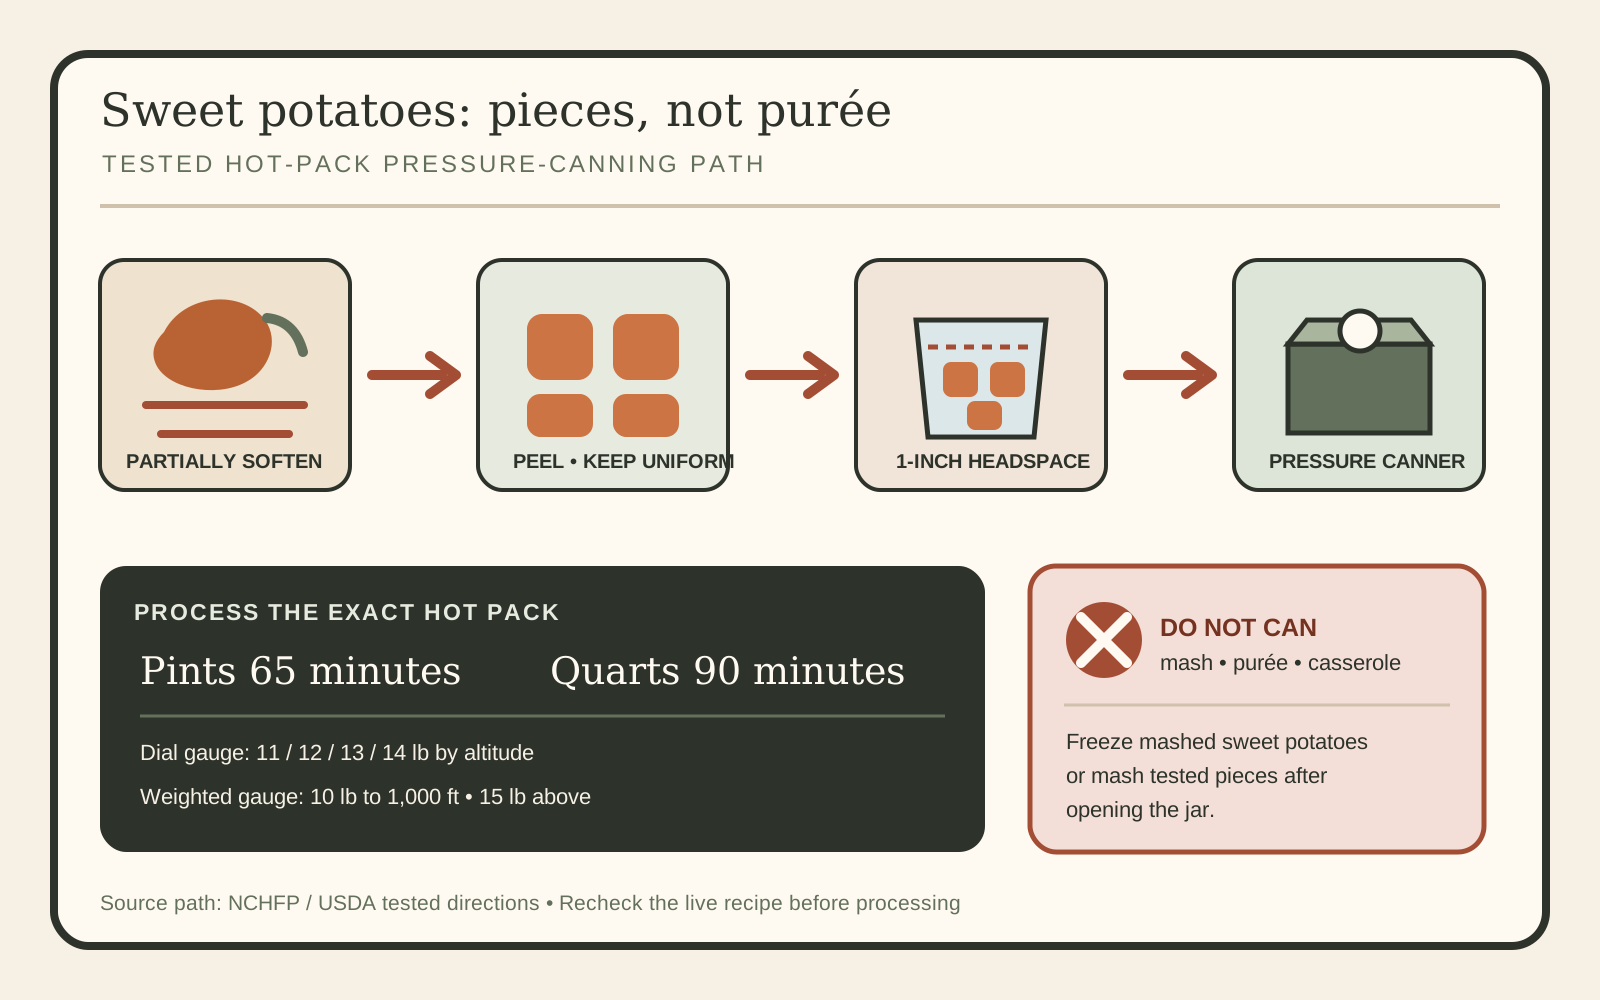
Sweet potatoes arrive in holiday kitchens with a strong pull toward customization: brown sugar, butter, citrus, spices, marshmallows, purée, pie filling, and casserole. Those are useful serving ideas. They are not the tested home-canning process.
The National Center for Home Food Preservation publishes one specific sweet-potato method, adapted from the USDA Complete Guide to Home Canning: small whole potatoes or uniform pieces are partially cooked, peeled, hot-packed with fresh boiling water or syrup, and processed in a pressure canner. NCHFP explicitly cautions against mashing or pureeing the pieces and says dry packing is not recommended.
That makes this a good November project—but only when the pantry plan stays separate from the holiday recipe. Put plain tested pieces on the shelf. Drain, mash, season, bake, or turn them into pie after opening. If the goal is a ready-to-reheat mash or casserole, freeze it instead.
Why pieces and purée are different canning products
Pressure canning is a measured heat process. The tested time assumes a particular food, preparation, pack style, jar size, headspace, initial temperature, and jar density. Changing pieces into mash changes how the product moves and how heat reaches the slowest-heating area in the jar.
Sweet potatoes are a low-acid vegetable. They must reach the heat treatment established by a research-tested pressure-canning process. A jar sealing only shows that a vacuum formed as it cooled; it does not prove that the cold spot received the required process. Adding extra time by intuition does not create a validated mash process.
The same principle appears in the site’s pumpkin and winter-squash guide: tested directions cover a defined piece size and liquid pack, not dense purée. Penn State Extension likewise warns that starch slows heat transfer and says not to can mashed potatoes or other dense potato products without a tested process.
Public canning discussions repeatedly ask whether a pressure canner can “make up” for fully baked or mashed sweet potatoes, and why jars sometimes vent orange liquid. Those discussions are useful for finding the questions, not for setting the method. The answers here come from NCHFP, USDA, and Extension directions: preserve the product form, hot pack, liquid, headspace, jar size, time, pressure, and cooling sequence.
Choose mature, nonfibrous sweet potatoes
NCHFP recommends small to medium sweet potatoes that are mature and not too fibrous, canned within one to two months after harvest. Penn State recommends allowing freshly dug roots to cure for at least a week. Sort out roots with decay, deep damage, freezing injury, or quality you would not choose for the table.
The average quantities are substantial: NCHFP lists about 17½ pounds for a canner load of seven quarts and about 11 pounds for nine pints. A 50-pound bushel yields roughly 17 to 25 quarts, averaging 2½ pounds per quart. Treat those as planning averages, not a reason to force a fixed weight into each jar.
Choose the jar size before prep. The process allows pints and quarts, but the times differ sharply. Check the canner’s capacity, the amount of water required by its manual, the number of matching jars, new lids, sound bands, jar lifter, headspace tool, clean towels, and a timer. If using a dial-gauge canner, confirm the gauge is accurate under the manufacturer or Extension schedule.
Partially cook, peel, and keep the pieces uniform
- Wash the sweet potatoes. Remove soil under clean running water. Do not use soap.
- Boil or steam 15–20 minutes. The NCHFP direction is partially soft—not raw and not fully baked into a collapsing texture.
- Cool only enough to handle. Remove the skins. Do not let the batch become cold while the hot-pack process waits.
- Size consistently. Leave suitable small roots whole. Cut medium roots when needed so pieces are uniform. Penn State specifies no larger than about 2¼ inches in diameter.
- Do not mash or purée. Do not press softened pieces into a dense jar or use fully baked mash as the starting product.
Work in manageable batches. Fully cooking every root before the canner and then letting peeled pieces sit can turn the hot pack into a cool, fragile pack. The goal is a hot prepared product entering hot jars and then the prepared pressure canner without a long delay.
Prepare the packing liquid separately. NCHFP allows fresh boiling water or syrup. Penn State lists syrup options of 2 cups white or brown sugar to 5 cups water, or 1 cup honey plus 1 cup white sugar to 5 cups water. Plain boiling water is also a tested choice. The liquid is not permission to add dairy, fat, thickeners, or a casserole formula.
Fill hot jars with one inch of headspace
Pack the hot sweet potatoes into a hot jar. If desired, add canning salt—NCHFP states 1 teaspoon per quart; Extension directions commonly state ½ teaspoon per pint. Salt is for flavor, not safety. Cover the packed product with fresh boiling water or the chosen tested syrup, leaving 1 inch of headspace.
Slide a nonmetallic bubble remover through the jar as the tested method directs, then recheck headspace. Add boiling liquid if needed. Wipe the rim with a dampened clean paper towel, center the prepared lid, and apply the band fingertip tight according to the lid manufacturer. Place the filled jar on the canner rack and continue one jar at a time so the pack stays hot.
Do not dry pack. NCHFP specifically says dry packing is not recommended. Do not crowd the pieces above the liquid or press them down to fit more. The tested process includes the boiling liquid around the pieces and the stated headspace.
Keep the time fixed and adjust pressure for altitude
The hot-pack process is 65 minutes for pints and 90 minutes for quarts. Altitude changes the required pressure, not those times. Confirm the elevation of the kitchen—not the elevation of a nearby town—and identify whether the canner uses a dial or weighted gauge. The site’s altitude guide explains why the two gauge types use different bands.
| Canner type | Elevation | Required pressure |
|---|---|---|
| Dial gauge | 0–2,000 feet | 11 lb |
| Dial gauge | 2,001–4,000 feet | 12 lb |
| Dial gauge | 4,001–6,000 feet | 13 lb |
| Dial gauge | 6,001–8,000 feet | 14 lb |
| Weighted gauge | 0–1,000 feet | 10 lb |
| Weighted gauge | Above 1,000 feet | 15 lb |
Do not use a boiling-water canner, atmospheric steam canner, small pressure cooker, or electric multicooker as a substitute. NCHFP’s USDA processes are designed for pressure canners that hold at least four upright quart jars on a rack with the lid in place. A pressure cooker reaching a displayed pressure does not make it equivalent to the tested canner system.
Vent the pressure canner and protect the full process
Add the water amount specified by the canner manual and tested recipe—commonly 2 to 3 inches—then load the hot jars on the rack. Lock the lid and leave the vent open. Heat until steam flows freely, then vent a steady funnel of steam for a full 10 minutes. Venting removes air; trapped air changes the steam temperature and can leave the canner cooler than the gauge reading implies.
After 10 minutes, close the petcock or place the weight. Bring the canner to the pressure selected for the gauge and kitchen elevation. Start the 65- or 90-minute timer only after required pressure is reached. Adjust the burner gradually to keep pressure steady.
If a dial-gauge canner drops below the required reading, or a weighted gauge stops regulating as its manual describes, return the canner to pressure and restart the full process time from zero. Do not subtract the minutes already completed. Large pressure swings can also drive liquid from jars, so steady heat matters for quality as well as process control.
At the end of the full time, turn off the heat. Leave the canner in place if it can cool safely. Let pressure return to zero naturally. Do not force cooling with water, lift the weight, open the vent, or move the canner to rush depressurization. After it is fully depressurized, remove the weight or open the petcock, wait 10 minutes, then unlatch and open the lid away from your face.
Lift jars straight up and place them upright on a towel or rack away from drafts. Do not tilt them to pour liquid from the lid, press the lids, tighten the bands, or wash residue from hot jars.
Cool, check, wash, label, and store
Leave jars undisturbed for 12 to 24 hours. Then remove the bands and check every seal using current NCHFP guidance. Wash and dry sealed jars, label the contents and processing date, and store jars without bands in a cool, dry, dark place. The site’s seal and storage guide covers the routine and warning signs.
For an unsealed jar, refrigerate promptly, freeze in a suitable container, or reprocess within 24 hours only when the original tested recipe was followed and current reprocessing directions can be met. Reprocessing means a new lid, a complete process, and more quality loss; it is not a partial top-up.
Do not taste a jar with a broken seal, bulging lid, leakage, spurting liquid, mold, rising bubbles, unnatural odor, or uncertain process history. Botulism toxin cannot be reliably seen, smelled, or tasted. Follow current NCHFP disposal directions and keep people and animals away from suspect food.
For mashed sweet potatoes, choose one of two safe workflows
Pantry workflow: pressure-can the tested pieces exactly as directed. At serving time, open the jar, inspect it, drain if desired, heat the sweet potatoes, and mash or season them for immediate use. The pantry jar remains plain and flexible.
Freezer workflow: cook sweet potatoes until almost tender, cool, peel, and mash under a current freezing method. Penn State notes that 2 tablespoons of orange or lemon juice per quart can help keep frozen mash from darkening. Package in freezer-safe containers with suitable headspace, label, freeze promptly, and thaw under safe refrigeration guidance. If freezing a finished casserole, use a tested or reliable freezing recipe designed for the added ingredients and package size.
Neither workflow turns a favorite casserole recipe into a canned product. Butter, milk, cream, marshmallows, nuts, flour, and a thick purée change the product. Add them after opening a tested jar, or keep the prepared dish refrigerated or frozen.
Questions from the holiday kitchen
Can mashed sweet potatoes be pressure canned?
No current USDA or NCHFP process supports home canning mashed or pureed sweet potatoes. Can tested pieces and mash after opening, or freeze the mash.
Can sweet potatoes be water-bath canned?
No. Sweet potatoes are a low-acid vegetable. The tested method requires a pressure canner. Boiling water remains near the local boiling point no matter how long it boils and cannot substitute for the tested pressure process.
Can I bake the sweet potatoes before filling jars?
Follow the tested preparation: boil or steam 15–20 minutes until partially soft, then remove the skins and keep the product whole or in uniform pieces. Fully baking can create softer, denser pieces that no longer match the preparation.
Can I add cinnamon, butter, brown sugar, or marshmallows?
The tested method lists sweet potatoes, optional salt, and fresh boiling water or an allowed syrup. Do not add butter, dairy, marshmallows, thickeners, or a casserole formula. Season after opening. If choosing syrup, use the tested proportions rather than inventing a denser pack.
Why do pints take 65 minutes but quarts take 90?
Jar size changes the heat-penetration challenge. Use only the process assigned to the jar size in the tested method. Do not use the pint time for quarts, and do not process jars larger than quarts.
Can I use yams?
U.S. grocery labels sometimes use “yam” for orange-fleshed sweet potatoes, while true yams are a different crop. Identify what you have. The NCHFP process is for sweet potatoes; do not assume it covers another root by a similar market name.
Sources checked
- National Center for Home Food Preservation: Potatoes, Sweet—Pieces or Whole
- NCHFP: Using Pressure Canners
- NCHFP: USDA Complete Guide to Home Canning
- Penn State Extension: Let’s Preserve Potatoes and Sweet Potatoes
- Penn State Extension: Time, Temperature, and Pressure in Canning Foods
- Ohio State University Extension: Canning Basics
Reviewed November 9, 2026. Reopen the current tested directions before processing because source pages and recommendations can change.
Community discussion
Discuss this guide
Share a page-specific result or question about the tested sweet-potato process. Replies are reviewed before they appear; untested substitutions, unsafe canning advice, copied material, spam, personal information, and unsupported medical claims are rejected.
Loading approved notes…