Canning turkey stock safely: keep the holiday carcass on a tested path
A turkey carcass can become useful shelf-stable stock—but only if the leftovers were handled safely, the stock matches a current tested method, and every hot jar completes the right pressure-canner process for your elevation.
Holiday stock attracts two kinds of improvisation. The first happens at the table: the carcass sits out while guests linger, then gets tucked into an overfilled refrigerator. The second happens at the canner: a cook adds the stuffing, roasted vegetables, gravy, herbs, noodles, or a favorite long-simmer method and assumes pressure will make the variation safe. Pressure canning is not a rescue step for mishandled leftovers, and a processing table does not turn an untested mixture into a tested recipe.
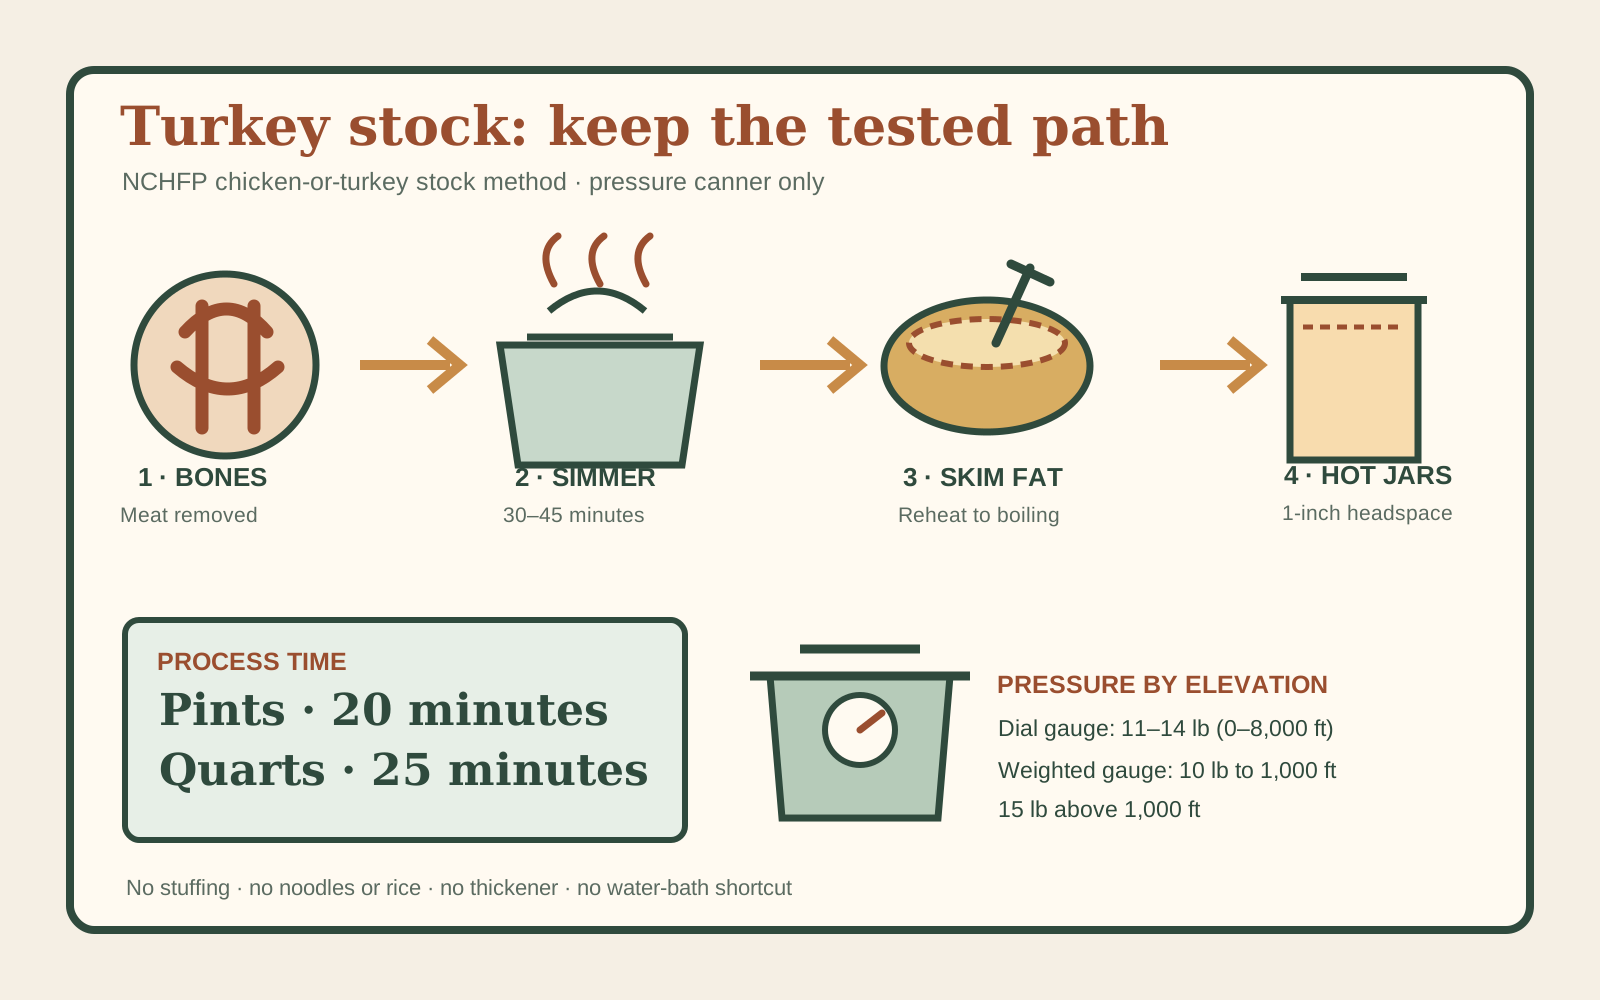
The National Center for Home Food Preservation publishes a specific chicken-or-turkey stock method. It begins with large carcass bones after the meat has been removed. Water covers the bones. After a short covered simmer, the bones come out, excess fat is discarded, the stock returns to a boil, and hot stock is pressure-canned in pints or quarts. This guide stays on that path and explains the decisions that cause the most uncertainty.
Start with a safely handled carcass
Plan before the turkey reaches the table. Set aside shallow containers, labels, refrigerator space, and freezer space. USDA Food Safety and Inspection Service guidance says to refrigerate leftovers at 40°F or below within two hours—one hour when the temperature is above 90°F—and to divide them into shallow containers for faster cooling. Refrigerated leftovers should be used within three to four days or frozen for longer storage.
Remove usable meat from the bones promptly rather than storing the intact roasted bird as one dense mass. Keep the meat for meals, refrigerating or freezing it within the safe time window. The NCHFP stock method begins with the large carcass bones with meat removed. Tiny meat tidbits that loosen during simmering may be recovered and returned to the strained broth if desired, but this is not the process for jars packed with leftover sliced or shredded turkey.
If the bird was stuffed, remove all stuffing. Bread, rice, sausage, egg, dairy, and thickened gravy do not belong in this stock method. An Extension answer to a 2026 reader question specifically advised removing all stuffing before using a carcass for stock. If the carcass sat out too long, was stored warmer than 40°F, has an uncertain history, or shows spoilage, discard it. Pressure canning cannot reverse earlier toxin formation or make questionable food wholesome.
A frozen carcass can be a practical scheduling tool when it was frozen promptly. Package it in a food-safe freezer container, label the date, and thaw safely in the refrigerator. Do not thaw it on the counter. If the stock-making and canning session will not fit comfortably into one day, freezing the safely handled carcass is better than holding it in the refrigerator until the edge of the safe-use window.
Make the stock by the tested route
Put the large carcass bones in a stockpot and add enough water to cover them. Cover the pot and simmer for 30 to 45 minutes, or until any small meat tidbits still clinging to the bones release easily. This is the published NCHFP preparation. It is not a directive to pressure-cook the bones for hours, reduce the liquid to a concentrate, roast them again, or simmer until the stock becomes thick and gelatinous.
Remove the bones. Strain the liquid so small bone fragments do not reach the jars. Cool the broth and discard excess fat. Penn State Extension suggests rapidly cooling stock in small containers or an ice-water bath, then chilling it so fat solidifies for removal. USDA advises dividing large quantities of hot food into shallow containers rather than putting one deep stockpot into the refrigerator. Keep the entire cooling step within safe food-handling limits.
Skimming is not cosmetic. Excess fat can interfere with sealing and makes a lower-quality pantry product. Do not scrape the fat cap back into the stock or “leave a little for flavor.” If desired, remove only the tiny amount of meat still attached to the bones and add those tidbits back, as the NCHFP method allows. Then reheat the stock to a full boil for hot packing.
| Keep in the NCHFP stock | Leave out of this method | Use instead |
|---|---|---|
| Water used to cover meat-free carcass bones | Stuffing, bread, rice, noodles, barley | Add starch after opening, at serving time |
| Strained stock with excess fat discarded | Flour, cornstarch, cream, milk, gravy | Thicken or enrich after opening |
| Optional tiny meat tidbits released from bones | Jars packed with leftover turkey meat | Use a separate current tested poultry process |
| The exact hot-pack stock process | Favorite vegetables, herbs, wine, or concentrate added by feel | Use a separate current tested recipe that names them |
Questions about onions, carrots, celery, garlic, herbs, lemon, and roasted drippings are common in public canning discussions. Their culinary appeal does not make them part of this method. A different research-tested recipe may include specific vegetables in specific amounts and use a different process. Follow that recipe as a complete system rather than importing its ingredients into the NCHFP bones-and-water method.
Do not reduce stock into bouillon or “bone broth” concentrate for this process. NCHFP’s 2025 guidance says commercial broth or stock concentrates may be used only when a tested recipe calls for broth or stock, and they must be fully dissolved according to the manufacturer’s directions. That update does not create a tested home-canning process for homemade concentrate.
Prepare the canner and jars before reheating
Inspect Mason-type home-canning jars for chips and cracks. Use pints or quarts—the two sizes in the stock table—and follow the lid manufacturer’s directions. Keep clean jars hot for the hot pack. Check the canner gasket, vent port, safety plug, rack, and gauge according to the manufacturer. Dial gauges should be checked for accuracy each year; local Extension offices can often help.
A small pressure cooker is not a pressure canner. NCHFP says a canner used for USDA low-acid processes must hold at least four quart jars standing upright on a rack with the lid in place. Come-up and natural cool-down time contribute to the tested heat process; small cookers and multicookers have different heating and cooling behavior.
Put the rack and the amount of water specified by the canner instructions and tested process in the canner. NCHFP’s general direction is about two to three inches when a food-specific process does not state otherwise. Center the canner on a level burner that the canner manufacturer and range manufacturer permit. Very large canners may be unsuitable for glass cooktops or portable burners.
Fill boiling-hot stock with 1-inch headspace
Bring the defatted stock back to boiling. Ladle boiling-hot stock into one hot jar at a time, leaving 1 inch of headspace. If using the allowed tiny meat tidbits, distribute them without turning the jar into a meat pack. Remove air bubbles as the tested method directs, recheck headspace, and wipe the rim with a dampened clean paper towel.
Center the lid and apply the band to fingertip tight according to the lid instructions. Over-tightening can prevent air from venting from the jar. Place the filled jar on the canner rack and continue with the next. Keep the stock hot; do not fill every jar and let them cool on the counter while waiting for canner space.
Keep the time fixed; adjust pressure for elevation
The NCHFP hot-pack process time is 20 minutes for pints and 25 minutes for quarts. Elevation changes the required pressure, not those times. First confirm the kitchen elevation and whether the canner has a dial gauge or weighted gauge. If either is unknown, pause. Our altitude guide explains how those two decisions fit together.
| Canner type | Elevation | Pressure |
|---|---|---|
| Dial gauge | 0–2,000 feet | 11 lb |
| Dial gauge | 2,001–4,000 feet | 12 lb |
| Dial gauge | 4,001–6,000 feet | 13 lb |
| Dial gauge | 6,001–8,000 feet | 14 lb |
| Weighted gauge | 0–1,000 feet | 10 lb |
| Weighted gauge | Above 1,000 feet | 15 lb |
These numbers are recipe directions, not a pressure range to average. A dial-gauge canner must remain at or above the required reading for the entire timed process. A weighted gauge must maintain the manufacturer-described regulator behavior. Do not substitute a familiar pressure from another food or rely on the elevation printed in a distant town.
Vent, process, and cool without shortcuts
Lock the lid as the canner manual directs, leaving the vent open. Heat until steam flows freely from the vent, then vent a steady funnel of steam for a full 10 minutes. Venting drives air from the chamber; air-steam mixtures are cooler than pure steam at the same gauge pressure. After 10 minutes, close the petcock or apply the weight and bring the canner to the pressure selected from the table.
Start the 20- or 25-minute timer only when the required pressure is reached. Adjust heat to maintain it. If a dial gauge falls below the required pressure or a weighted gauge stops regulating as its manual describes, bring the canner back to pressure and restart the full processing time from zero. Do not add a few minutes to compensate.
When the full time is complete, turn off the heat. If the canner can be left in place safely, do not move it. Let pressure return to zero naturally. Do not cool the canner with water, open the vent, remove the weight early, or force the lid. Forced cooling can cause liquid loss and may shorten the heat treatment.
After the canner is fully depressurized, remove the weight or open the petcock. Wait 10 minutes, then unfasten the lid and open it away from your face. Remove jars upright and place them on a towel or rack away from drafts, leaving space between them. Do not tighten bands, press lids, tip jars, or wash them while hot.
Check seals after 12 to 24 hours
Cool jars undisturbed for 12 to 24 hours. Then remove bands and test each seal using the current NCHFP method. Wash and dry sealed jars, label the product and canning date, and store without bands in a cool, dry, dark place. Our seal and storage guide covers the full routine.
Liquid loss does not automatically mean a jar is unsafe, but a jar that lost half its liquid or more should be refrigerated and used within a few days even if sealed, according to NCHFP quality guidance. Do not open a hot jar to replace liquid. For an unsealed jar, refrigerate promptly, freeze in a suitable container, or reprocess within 24 hours only if the original tested process was followed and current NCHFP reprocessing directions can be met.
Never taste from a jar with a broken seal, bulging lid, leakage, spurting liquid, rising bubbles, mold, unnatural odor, or uncertain process history. Botulism toxin cannot be seen, smelled, or tasted. Follow current NCHFP disposal guidance for suspect jars and keep people and animals away from the contents.
Questions from the post-holiday kitchen
Can I water-bath turkey stock?
No. Poultry stock is a low-acid food. The tested process uses a pressure canner so the jars reach temperatures above boiling water. A longer boiling-water time does not substitute for pressure.
Can I include leftover turkey, stuffing, gravy, or vegetables?
Not in this stock method. Remove meat and all stuffing. The method allows only the tiny meat tidbits that loosen from the bones. Use separate current tested directions for poultry or soup, and do not combine holiday leftovers into jars by intuition.
Can I add noodles, rice, flour, or cream?
No. NCHFP’s tested soup procedure excludes noodles, pasta, rice, flour, cream, milk, and other thickeners. These ingredients interfere with heat movement or have no tested home-canning process in that mixture. Add them after opening the stock.
Can I can stock that cooled overnight?
The NCHFP method includes cooling the broth so excess fat can be removed, followed by reheating to boiling. Cool it rapidly and refrigerate at 40°F or below within the USDA time limit. If it sat at room temperature too long, do not can it.
Why are stock times shorter than poultry-meat times?
Use the time assigned to the exact tested product. Stock is a mostly liquid hot pack with, at most, tiny meat tidbits; jars packed with poultry pieces have a different heat-penetration challenge and separate longer processes. Never choose the shorter stock time for jars containing substantial meat.
Sources checked
- National Center for Home Food Preservation: Chicken or Turkey Stock
- NCHFP: Recommended Canners and Pressure-Canning Steps
- NCHFP: Revised Recommendations for Stock/Broth Concentrates (June 25, 2025)
- Penn State Extension: Preparing and Preserving Chicken or Turkey Stock
- USDA FSIS: How Do I Handle Leftovers Safely? (updated December 20, 2024)
- Ask Extension: Turkey Stock (answered January 5, 2026)
Reviewed November 3, 2026. Reopen the current NCHFP method before processing because source pages and recommendations can change.
Community discussion
Discuss this guide
Share a page-specific result or question about the tested turkey-stock process. Replies are reviewed before they appear; untested substitutions, unsafe canning advice, spam, personal information, and unsupported medical claims are rejected.
Loading approved notes…